How To Brighten Up a Tired Face
Learn How to Create an Inviting Guest Bathroom Design in Your Bucks County HomeOne of the best things about the holiday season is having people to stay in your home. Entertaining guests is important, but so too is creating a sanctuary for them with a well-prepared guest bathroom. To ensure your visitors feel happy and relaxed, good bath design is called for, along with a few extra touches for a guest bathroom or powder room. 1. KEEP IT SIMPLEAs with any bathroom design, invest in a good shower, toilet and sink with a vanity. Make sure there is a mirror and decent lighting for people to get ready. A bathtub probably won't be necessary in your guest bathroom design unless you anticipate visitors with small children. While you can experiment with color in the master bathroom, it's best to adhere to a neutral or monochrome palette in the guest bath. Play with textures and shapes and incorporate a statement piece but try to appeal to everyone's taste. 2. LUXURY TOUCHESYou're not running a hotel, but it's still nice to add luxe extras for your guests to enjoy during their stay. They'll probably bring basic toiletries but put out a basket of high-end pampering products as well as supplying essentials they may have forgotten. Have a plush robe on hand for each person in addition to fluffy towels in different sizes, remembering to hang hooks or rails for them to dry on. Candles and diffusers give a welcoming feel and show your guests that you've taken the time to make them feel special. 
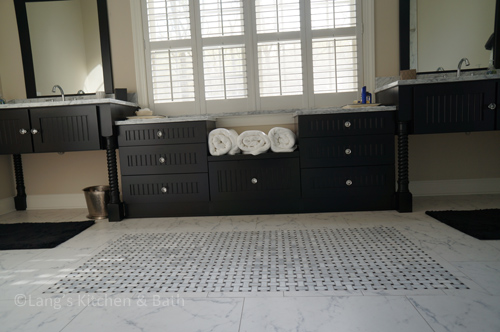
3. TAKE TIME TO SET UPWhile it's important to show visitors that everything is at hand, things should be displayed with thought and presented meticulously. Open shelving is the best solution as people can find what they need without rooting around. When displaying items, sort them into groups and then vary their size, to give an ordered yet interesting look. Hairdryers and toilet paper can go in a little vanity included in your customized bathroom design storage. 
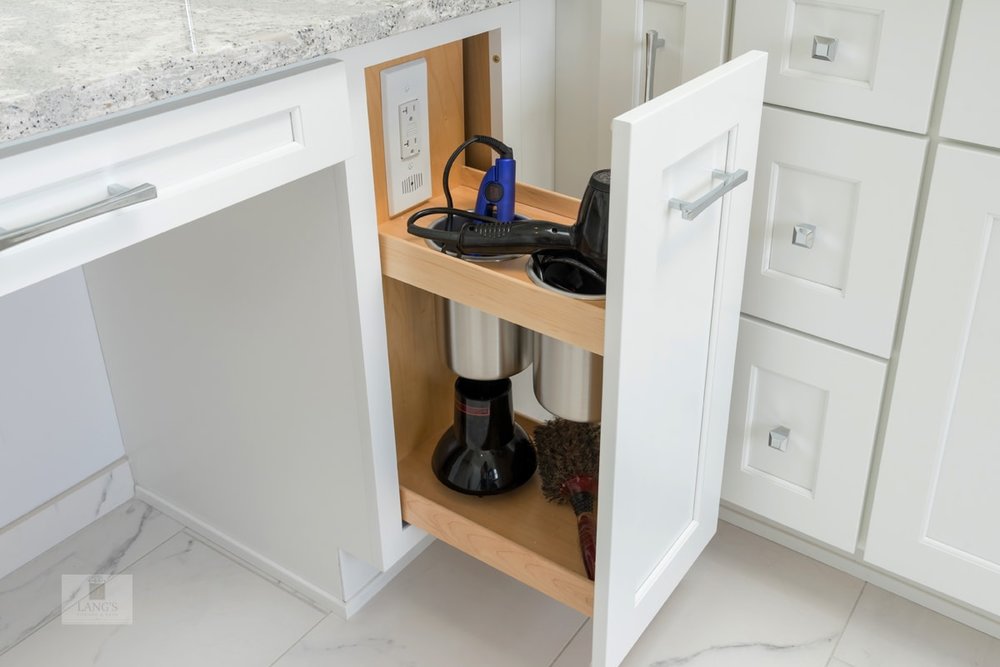
4. LEAVE SPACERemember to leave some space free when planning your remodel. Guests will appreciate having somewhere to put their own essentials. Resist the urge to accessorize too much. Guests might have to move a bowl of potpourri to clear space for their medications and essential toiletries! Also, remember that this is not a room to store your extra things. It should be a dedicated room for guests, at least while they are staying with you. 
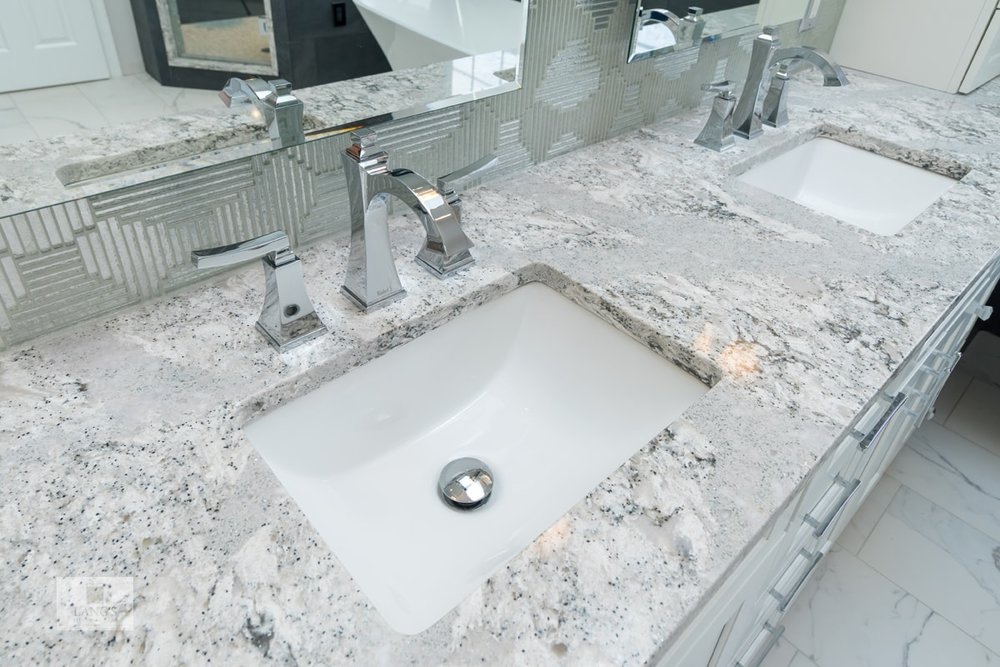
5. PRACTICALITIESThink about who will be coming and for how long. Bathroom rugs are a good idea to prevent elderly people slipping on a tiled floor. If your guests are long-term visitors (more than a few days) then include a laundry basket for them to use. Don't forget extra touches like plungers, air neutralizers and extra toilet paper, to avoid potential embarrassment. This also applies to your frequently used powder room. 
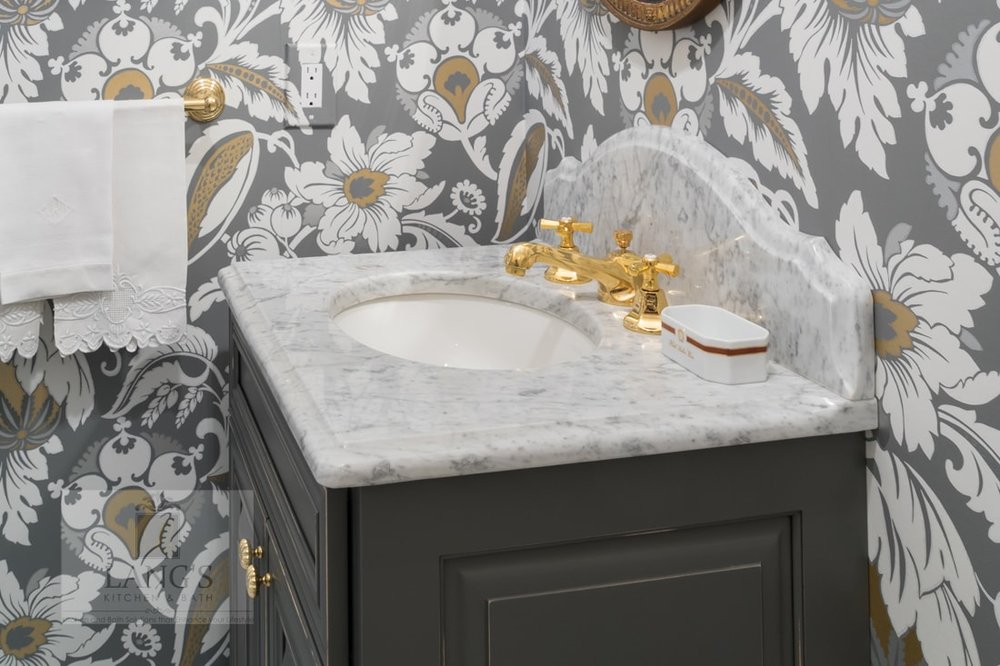
The master bathroom is often the main priority in bath design, but the guest bathroom design should feel special too. Look at our bathroom gallery for more ideas and contact our design experts to help you create an inviting bath remodel that will wow your guests for years to come.
0 Comments
Every new year millions of people make resolutions to get organized, simplify, lose weight, exercise more, spend less time on their phones, save money, etc.
The reality is only about 8% of people succeed in keeping their resolutions. Why do so many people, who have great intentions fail? The problem is most people have a laundry list of things they want to change or improve each year and the goals aren't very specific. For example, one year I decided I wanted to simplify my life. That's a great goal because who really wants a more complicated life? But how could I actually simplify things? What I should have said was: “This year I'm going to wait 48 hours before I say “yes” to any new commitments so I can evaluate whether or not it is worth saying yes to.” In order to keep your resolutions, you need can't just say you want to get organized or lose weight. You need a plan. How to Keep Your ResolutionsBe specificIt is easy to say, “I want to get in shape” but it is actually hard to get in shape. A few years ago I decided that I would always take the stairs if possible. Taking the stairs is something specific I could do to move towards a healthier lifestyle. It was also achievable. I'm in good health, so going up and down stairs was something I was capable of doing. Sometimes I would get winded, but I resolved to get in better shape so that going up a few flights of stairs was no problem. Today I can easily carry luggage up and down the stairs at the airport without breaking a sweat. The small change of taking the stairs, triggered other changes in my life. I didn't want to get sweaty and gross walking up the stairs so I focused more on my physical fitness. Make them achievableWhen thinking about setting resolutions, try to come up with specific and achievable goals. If you want to get organized, take an afternoon to create an organizing plan. Instead of writing down, “organize house” write down “organize pantry” or “clean out coat closet” Set a goal of organizing one specific space a week (or a day). 
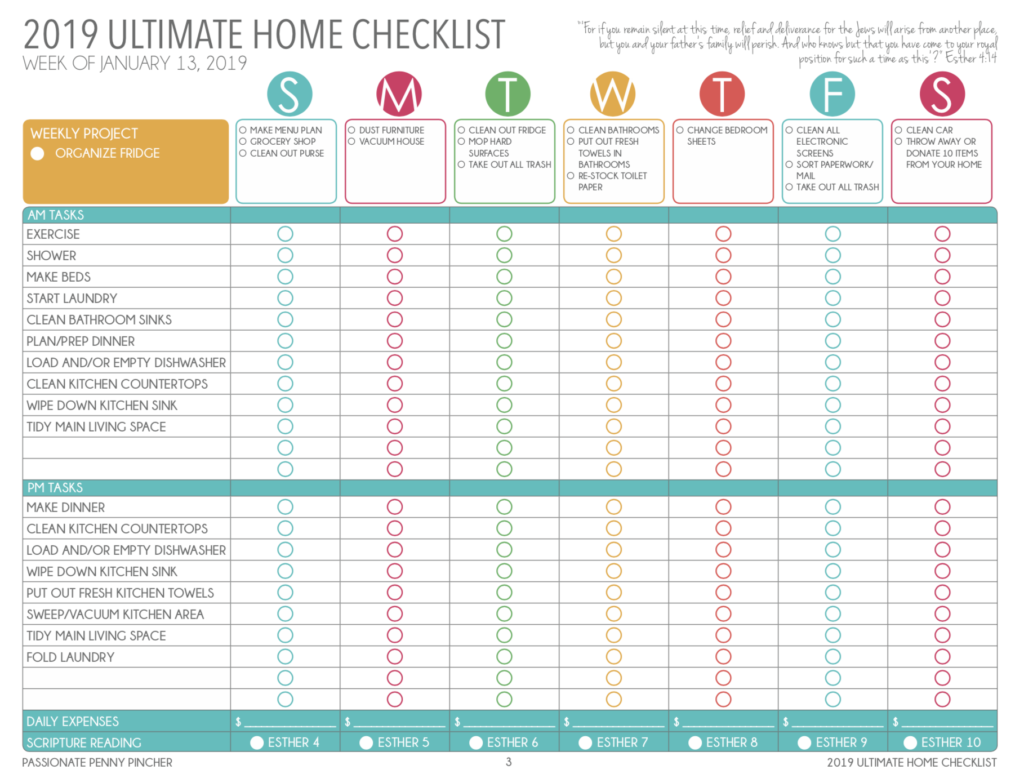
Everyone is capable of organizing spaces one at a time by making a few small changes to your daily or weekly routine. If you aren't naturally organized check out a book at the library for motivation or purchase a daily/ weekly checklist. Ask one of your super organized friends to come over and help you get started. Make sure the goals you set are ones you have the ability to reach. Be accountableWhen I started to get fit, I did not like going to the gym. I hated it. I decided to hire a trainer to keep me accountable. Not everyone can afford a trainer (I needed one due to a previous back surgery) but everyone needs someone to hold them accountable. Share your goals with a friend or family member so they can check up on you and maybe even work towards those goals with you. I've found that with every big accomplishment in my life, there has been someone that was constantly checking up on me making sure I stayed on track. Make it enjoyableIf you absolutely hate what you are doing, chances are you are going to try and avoid doing it at all costs. If you hate to cook, you probably are not going to want to menu plan and make dinner seven nights a week. I like to build in little rewards to motivate me to do things I don't love to do. So if I hated to cook I would probably reward myself with two nights off a week (either go out or have the kids make sandwiches for themselves) if I cooked the other five nights. Or I would find out how much money I saved by cooking at home and use the extra funds to do something fun like take a weekend vacation or buy something fun for the house. A few years ago I stopped making resolutions. I decided instead to evaluate my schedule/ life every month and decide what I needed to focus on. For example this month I decided to focus on making dinner every night. This is actually quite challenging since my girls have practice every night of the week from 5:30-7:30pm. However I realized that because of these practices my family was eating way to many frozen pizzas and junk food. I looked at my schedule and realized there were some nights we could eat dinner at 4:30 and other days the child with practice could either take dinner with them to practice or eat when they got home. So far I've made dinner every single night of 2019 and my kids aren't complaining. ? These dinners aren't fancy (chicken, tacos, spaghetti) but I'm getting into a routine and finding out what works for our schedule. I anticipate by the end of the month I'll have figured out how to make it work with our crazy practice schedule. I might not make dinner every single night of 2019 (and I don't want to, lol) but I will have created a system and routine that allows me to make dinner more often than not. Next month I'll be in a routine of making dinner more frequently and be able to focus on the next project. Here are a few of my favorite things this month. Adore your WardrobeThis course from my friend Kelly is LIFE CHANGING! You can look amazing no matter what your size or your budget based on principals found in math and science. Kelly's course completely changed how I dressed and how I felt about clothes. She only offers the course a few times a year so check it out. Ultimate Home ChecklistI LOVE lists. The Ultimate Home Checklist is a great tool for keeping your home organized through specific tasks you do each day. This planner breaks down chores into small projects that can be done in a few minutes. If you struggle with keeping your house clean and organized this planner is for you! Freezer CookingI use to think freezer cooking was bland casseroles and lots of lasagna. But it really isn't. I love freezer cooking because I don't have to think about dinner. The meals are already prepared and ready to be put in the oven or the crock pot. It really does take the stress out of cooking dinner every night. I use My Freezeasy for freezer meal ideas, recipes, and shopping lists but you can find them on Pinterest too! The In-BetweenI read this book last summer and it really changed my perspective on life in the mundane. It's a quick read about learning to live in the “tension between now and the next big thing' and I highly recommend it! The post How to Keep Your New Year's Resolutions appeared first on The Happy Housewife™. Katelyn Jones of A Touch of Pink takes on a bathroom remodel starring the Delta UPstile Wall System. Read below to see the full transformation from the demo to the final finished space. Beautiful Bathroom RemodelOur family moved into our house not even 6 months ago which had a standard track-house bathroom with basic materials. With a new baby on the way, I wanted to add my own personal touch to the kid's bathroom. After 4 weekends of working and non-stop visits to our favorite place in orange, my husband and I converted our standard track-home bathroom into a custom modern masterpiece using the Delta UPstile shower system and products. I will show you step-by-step how we completed this! Products UsedDelta UPstile: 32 in. x 60 in. x 60 in. 3-Piece Direct-to-Stud Alcove Tub Surround with Customizable Design in White Shower Door: Delta Simplicity 60 in. x 58-1/8 in. Semi-Frameless Sliding Bathtub Door in Bronze with Clear Glass Shower Inlay Tile: Jeffrey Court Whisper Valley 11 in. x 12.687 in. x 6 mm Porcelain Mosaic Tile Shower Handle: Delta Victorian Lever Handle for Tub and Shower, Champagne Bronze Shower Valve: MultiChoice Universal Tub and Shower Valve Body Rough-In Kit Toilet: Delta Luxford 2-Piece 1.28 GPF Single Flush Round Front Toilet in White Tub: Delta Classic 400 60 in. Right-Hand Drain Oval Alcove Non-Whirlpool Bathtub in High Gloss White Vanity: Home Decorators Collection- Aberdeen 36 in. W x 22 in. D Single Bath Vanity in Dove Grey with Carrara Marble Top with White Basin Vanity Mirror: Artistic Weavers Koud 40 in. x 29.75 in. MDF Framed Mirror Floor Tile: MSI Carrara White Hexagon 12 in. x 12 in. x 10mm Polished Marble Mesh-Mounted Mosaic Floor and Wall Tile (10 sq. ft. / case) Wall Tile: Jeffrey Court Carrara 3 in. x 6 in. Honed Marble Wall Tile (8-Pack) Step 1: Demo DayObviously this part is the most fun! Who doesn't like making a mess and tearing up a space?! We used a number of tools to remove everything from the bathroom. We first started with the removal of the vanity, sink, toilet and other fixtures. We were then able to remove the shower. For this, we had to remove the drywall around the edges, take out the screws that secured the shower to the studs, then used a reciprocating saw to do the heavy lifting. Our shower was 1 piece so we first cut off the shower walls at the base where they met the tub. For the tub, it was tightly fit in the alcove and needed to be cut into multiple pieces for removal.
Step 2: Tub InstallationThe first part of installing the Delta UPstile Wall System is placing the tub, which is the base of the wall system. It is important that the existing plumbing connections are in the correct spot before placing the tub. Once the tub is placed, you can hook up the drain and overflow connections and pre-drill the holes in the flanges. You will want to make sure the tub is level before securing it into the alcove wall studs.
Step 3: Shower Wall InstallationStarting with the large middle wall, place the walls on the tub and dry fit them into place. This will make the actual installation of the walls much easier and prevent mistakes. For the wall with the spout and mixer valve, measure the plumbing connections, cut 2 holes with a hole saw and place the provided retardant pad on the inner side of the wall. I also had to replace the existing valve with the MultiChoice Universal Tub and Shower Valve which was compatible with my shower products. Step 4: Install Bracing for Shower WallsThe Delta UPstile Wall System is secured by an upper flange and additional screws placed in a groove along the tile section. You may need to install additional 2”x4” posts around the alcove frame before securing the supports. Using 1” x 3” pieces of pine wood, install supports around the shower. I equally spaced them by placing the first support on top of the tub flange then separating the following 2 supports by 12” and finally placing the top support 46” from the bottom brace. Step 5: Securing the WallsStarting with the middle wall, evenly place the provided double-sided tape along the supports and apply the suggested adhesive (DAP 3.0). The double-sided tape helps the wall remain firmly pressed against the wall as it dries. After placing the wall, insert panhead screws in the pre-drilled holes that were completed during the dry-fitting stage. Both in the upper flange along with the screw groove within the tile area. Once the walls were installed, I used my remaining 1”x3” supports to firmly push against the walls and letting it sit for 24 hours so the adhesive could cure.
Step 6: Install Custom Shower Inlay TileMy favorite part of the Delta UPstile Wall System is the custom wall tile section. I decided to use the Jeffrey Court Carrara 3 in. x 6 in. Honed Marble Wall Tile which matched well with the rest of the bathroom. Before cutting the tile with my wet saw, I laid it out across the floor and marked lines on the tile with a pencil. This makes it easy for the tile pattern to remain cohesive throughout the shower. For the installation of the tile, you will need to use the same caulk (I used the DAP 3.0) instead of a typical thinset and place tile spacers at the bottom of the tile to prevent sliding. Let the installed tile sit for at least 24 hours before grouting. Step 7: Install the GroutBefore grouting, I placed painters tape and plastic around the tile inlay which prevented mess and allowed for a smooth and straight grout line. Any particular grout can be used for the tile and shower system. Using a rubber bottom float I pressed the grout in between the tile spaces and cleaned it off with a large yellow sponge. After grouting all of the tile, I pulled off the painters tape and did any necessary cleanup with the sponge and let grout cure for 24 hours. Step 8: Final CaulkingTo finish up the Delta UPstile Wall System I caulked all of the seams on the shower to keep it water tight. Using painters tape as a guide will be your best friend, making the lines perfectly straight. Step 9: Installing Shower FixturesWe chose the Delta Victorian Shower Fixtures in the Champagne Bronze color which included the shower head, valve handle set and spout. Since the existing overflow cap did not match the other shower fixture products, we decided to spray paint the overflow cap, which came out very well. Other Products Installed:Shower Glass Door InstallThe installation directions for the glass shower doors are very easy to follow. I would suggest to have a miter saw box or a the correct blade on your miter saw to cut the glass door frames. New Light FixtureBefore installing the backsplash, we installed a new light fixture to go above the vanity. We went with the Filament Design 3-Light Warm Brass Bath Light. We used the existing wiring from the ceiling can light and redirect them to the new location above the vanity. That way we did not have to install a new switch. Carrera Marble Backsplash + Hexagon Floor TileWe installed the backsplash without spacers giving the wall a fresh smooth look. To seal the spaces in between tiles, we used an unsanded grout. For the floor tile, we used the Carrara Marble Hexagon tile. This color and tile brings an additional pop to our smaller bathroom.
VanityBefore installing the sink faucet, make sure the plumbing connections will fit. We had to make a small cutout on the shelf to fit the plumbing. Also, the front door pulls of the vanity came with chrome finish. For the door pulls to match the rest of the bathroom decor, we spray painted them black.
Vanity FaucetThe instructions given with the product make for an easy install. Make sure to have the correct materials and tools for the plumbing when installing. Also, you will need to caulk with silicone on the inner-lining of the sink before using. Toilet InstallationThe instructions that came with the toilet were easy to follow. One thing to consider when installing the wax ring. Given the new floor tile, the bottom toilet flange was not flush with the floor which required us to use two (2) wax rings. You will know if an addition wax ring is needed when placing the toilet if it simply lays flat without any pressure. You should have to apply moderate pressure to place the toilet, which makes for a tight seal. We also decided to upgrade the water connection hose for the toilet. Our plumber highly recommended this since the prior ones installed did not include additional safety features and could easily burst.
ShiplapInstalling shiplap in the bathroom added a lot of extra time to the project but was definitely worth it. we installed a small basic trim around the shower and filled the rest of the walls with shiplap. I used Behr Acrylic Paint which is water resistant and appropriate for the moisture in the bathroom.
Vanity mirrorTo install this mirror, we first installed a heavy duty metal wire on the back of the frame. We then used a wall screw anchor kit which came with the appropriate drill bit for the wall tiles. We also applied double-sided tape towards the bottom of the frame to keep the mirror from moving around. The post Beautiful Bathroom Remodel appeared first on The Home Depot Blog. “Will you marry me?”The big question is asked and answered favourably, the champers has been popped and now you have a new sparkly ring sitting on your left hand. The next question on everyone's lips and your Facebook feed is – when is the wedding? I have once heard marriage explained by a minister as “the commitment that remains once the lust has faded.” Very true words. The problem with wedding ceremonies these days is it is easy to lose the essence of the marriage within the dress, shoes, dove releasing, sand ceremonies, cars, bridezillas, groomzillas, bitchy bridesmaids, drunk mothers of brides and disapproving mothers of grooms. Many cultures have big weddings as a part of their traditions. Invitations are sent to cousins of cousins, the guy down the street that you met when you were two as well as every other Tom, Dick and Harry that has moved through your life. Although the guest list exceeds the 600 plus, this does not mean that the soul of this sacred occasion has been lost. Take a look at the delightful show Big Fat Gypsy Weddings. As gaudy and bright and completely OTT the weddings might be, we are told on the show that the gypsy community has a relatively low divorce rate. In their heritage, marriage is truly sacred. Many studies have shown that couples who have a big wedding are happier in their marriage, however, what it truly comes down to is the choices that are made by the couple on how the relationship is going to develop and evolve once the I do's are said. I have always wondered about women who have been planning their wedding their entire lives. Are they committing themselves to another person till death do they part or just until the wedding DVD is scratched? These big excessive weddings can place a lot of pressure on the couple if a large debt is accumulated and the expectation of a married life as big as the wedding cannot be met. Small intimate weddings can be lovely. They can be all about the marriage that commitment between two people without all the fan fair. But they can also be because families don't agree with the marriage or because family members don't get along. This can potentially lead to issues later in the marriage if the negativity towards the union is so great and the couple doubt their commitment to each other. Whether you go in for a big or small wedding – a marriage is not about how much the catering costs, the dress designer, or the type of wine served at the reception. It is about finding someone to commit your life to and allow that relationship to develop in a positive way. What was the thing that was truly special to you about your wedding?How can you make a house cleaning schedule? Cleaning schedules can help you to know what needs to be cleaned and how often it should be cleaned. A good house cleaning schedule makes it a lot easier to set with daily, weekly, monthly and yearly cleaning tasks. A cleaning schedule is an easy and effective way of maintaining all equipment regularly. Some items in a cleaning schedule require to be cleaning more than once a day, for example, kitchen cleaning, garbage of our house. Other items can be done once a week like home furniture cleaning, dust cleaning etc. In weekly cleaning, you can schedule bedroom cleaning as a major part. If you want to schedule your home cleaning with a maid cleaning service you can follow this. The post What Should be Your Cleaning Schedule appeared first on . I assume we are all similar in that when the new year comes around, we all make resolutions to stay on track. I crave order and organization, so I always spend the first few days of the new year putting my home back together after all the holiday madness and entertaining. Since I work from home, I often begin by organizing my home office. I partnered with Snapfish, and I am sharing unique, personalized ways to organize yourself (and office). Although I use an electronic calendar, I love having a calendar on my desk that I can view quickly. I am in love with this Woodblock Desk Calendar. There are so many design options to fit every decor style and personality. It gives me a month view at a glance, and this calendar would also make a wonderful gift! Are there any other list makers out there? I love the feeling of accomplishment and checking things off my list. Thanks to my customized softcover journal I am going to stay organized and on task this year. I added my logo to this gorgeously designed planner and am ready to tackle the new year! I sit at my computer desk for way too many hours, so I love this custom mousepad. It is easy to make, and you can instantly warm up your workplace with a personalized mousepad. Although I chose to keep my mousepad simple with just one photo, Snapfish offers so many customization options in their product builder:
You will instantly feel like a designer, and it so fun (and easy) to play around with all the options. I have a design background, and I have used lots of various programs over the years. This program offered by Snapfish is SO easy and well done! I am looking forward to writing thank you's with my new customized folded notecards. I was so impressed with the quality and price that I am planning to order some notecards just for my business. I feel ready to tackle 2019 thanks to my custom office product! Creating it was so easy, and I love that I have personalized supplies that look fantastic and function well! Whether you are looking to get organized and wanting a unique gift for friends or family, I highly recommend creating Snapfish photo product. Happy New Year! This is a sponsored post written by me on behalf of Snapfish. All opinions are 100% mine. Find me on Facebook | Instagram | Twitter | Pinterest The post Organizing a Home Office appeared first on Sincerely, Sara D.. Finding the right colours for your kitchen can be the difference from a fantastic design and one that looks disjointed and uncoordinated. What colour works best for your kitchen? This is a question that we are going to explore in this weeks' blog at the Kitchen Warehouse. You might have great cabinets, a new floor or modern appliances but if you mess up the wall colour this can all be in vain. Choosing the right colour to suit your design is vital. There are a few things to think about first and questions that you need to ask yourself. How much natural light do you have?The size of your kitchen and how much natural light you have will have a big impact on your colour scheme. Kitchen's that have a lot of natural light coming in can afford to have a darker colour on the wall. This could be with windows or even skylights and if there is an abundance of sunlight coming into the room you can potentially choose a duller colour. This is because there is light coming in anyway. In smaller kitchens or kitchens that have limited natural light, using darker colours can have a negative effect. It can make the room feel smaller and claustrophobic. However, does this mean that dark colours should be avoided altogether? Should you avoid darker colours?Not necessarily. Even if you don't have much natural light this doesn't mean that you can't have a darker shade on your wall either. Some people say that darker colours and dark neutral colours don't promote hunger which is kind of going against the whole point of the room! That being said, the design of every room in your home should be to your taste. If you like darker colours then why not have a dark blue or dark grey on your kitchen walls. If you prefer lighters colours then go for that. Darker shades shouldn't just be avoided outright. There are a lot of factors that can compliment navy, blacks or grays in the kitchen. Colours that go well in most kitchensThe debate about what colour works best for your kitchen can last for days without really getting anywhere. We have picked out 5 different colours that are generally universal. Warm NeutralsOK, so this isn't 'one' colour per se however warm neutrals cover a range of shades that can work wonders in your kitchen. Warm neutrals have hints and shades of brown, red, orange, or yellow undertones and work with pretty much any other colour scheme. The reason that warm neutrals tend to work better than what we would call cold neutrals (think colours with undertones of blue or green) is because they are more inviting. These colours fell a lot more homely and provide a friendlier nature to the room overall. You can combine warm neutrals with pretty much anything from striking kitchen cabinets to wood. They are also a good idea to use in a kitchen with an accent wall as we will see below. WhiteWhite can often be seen as a bit boring but it is highly effective in creating a clean and minimalist design. If you want a kitchen that looks uncluttered then white is a great choice. In fact, white painted rooms have an energy about them and as the kitchen is one of the first rooms you go into in the morning in search of some caffeine, white walls can offer a subconscious perk me up. Why not go white on white and combine this with white kitchen cabinets? It is a popular design trend and is becoming a real hallmark of modern kitchen design. BlueBlue is a colour that is not automatically associated with kitchen design. That doesn't mean that it can be used for great effect in the kitchen and it doesn't even need to be as an accent colour either. The thing with blue is that it provides a real crisp dimension to your room. It is recommended that you use it quite sparingly so resist the temptation to cover every part of the kitchen in blue. If you are wondering what colour works best for your kitchen and are stumped for ideas that are a little bit different than the norm then consider blue. It isn't that common and will make your kitchen have a unique slant. GreenWe've blogged about having green as one of the primary colours in your kitchen before – Why Green Is The New Must Have Colour. Many people think that green is outdated and is better left as a design trend a few decades ago. This isn't the case. Green can be a very effective colour to have in your kitchen and it can blend in and work very well with whites, grays and other light colours. Not only is it a very inviting colour it is natural too. Green reminds us of nature and if you want a calm and relaxing vibe to your kitchen, a light shade of green can really help to achieve this effect. YellowFinally, we have yellow. A nice bright colour that reminds us of sunshine and summer days. Can it work in your kitchen? Yes! if you are wondering what colour works best for your kitchen then yellow should be a stronger contender because it can go with nearly anything. In fact, if you have a lot of gray in your room then yellow works fabulously with this and helps to bring it to life. Yellow is great too at reflecting light so if you have a dull kitchen or one that doesn't receive a ton of natural light then yellow can help to brighten to the whole room. Think about an accent wall tooIf you are still debating what colour to paint your kitchen or if you think it could do with something to make it appear more modern then consider an accent wall. Creating an accent in your kitchen is very easy and can have a massive effect on how your room looks. It can bring attention to one particular part of the room or even just break up an monotony of colour. A kitchen accent can take many forms from accent lighting, accent kitchen cupboard doors or even just painting one room different than the rest. The possibilities here are endless. What colour works best for your kitchen?So, what colour works best for your kitchen? Like everything when it comes to kitchen design, it depends on you, your tastes and what you want. The colours we have shown you in this blog will generally go with anything in your kitchen. This is why they are so popular but don't be afraid to experiment and try something new. Just remember to ensure that you don't make your kitchen feel smaller wither dark colours if you have poor natural light or make it overly bright with light colours in a room that is already well lit. Whether you play it safe or go for something a bit left field, adding a splash of colour to your kitchen can really transform the room even if you don't do anything else. The post What Colour Works Best for Your Kitchen? appeared first on Kitchen Blog | Kitchen Design, Style Tips & Ideas | Kitchen Warehouse UK. Freaking acne. We thought we split ways with you after high school graduation. But when you continued to rear your ugly white head well into adulthood, in the most awkward times and places we might add, it makes us want to cry. A nice red bulb at the tip of the nose is anything but merry and we get it Rudolph-we get it. Waking up on the day of an important meeting to mounds that rival a gopher's playground is not cool. And we won't even talk about what cropped up all over our back right before that big beach trip. Acne, you're killing us! Acne isnt' just a puberty thing. Sadly, acne can plague adults well into their 20s, 30s, 40s, and even 50s. What causes adult acne?Chances are, if you had acne as a teen, you will most likely have it as an adult too. It's the universe's way of conspiring against you. Not really. You might just be one of the millions of people with oily skin. Oily skin+bacteria on the skin=clogged pores and breakouts. Contrary to popular belief, acne is not caused by poor hygiene. There are several factors quite frankly out of your control. They include: fluctuating hormones, stress, and pollution. There are however, some factors you can control. Using the wrong products and get this-cleansing too frequently and too vigorously can also cause acne. Hormonal acne often appears as deep, painful cystic acne around the jawline, neck and back. Freaking hormones. Stress acne happens whenever your stress levels get so high they activate your adrenal gland to create the hormone cortisol, which also lets a little testosterone leak through (yes, women have it too). It's that blasted testosterone who's to blame for increased oil production. Freaking testosterone. Okay, so how do I tackle it?It's one thing to research effective ways to treat acne, and it's another thing to chat with your girlfriends about what really works. Testimonials always trump research in our book. Here are the three most-talked-about ways to tackle adult acne for good. 1. Cleanse and PreventOne cleanse a day is enough to effectively wash away excess oil and bacteria from your skin's surface. Use warm, not hot water. We all know what happens to an oily pan when it hits hot water versus cooler water. Hot water wipes out all oils and you don't want that. If your skin doesn't have enough oil to nourish it, it will simply signal your body's oil glands to secrete more, making your problem a hundred times worse. Similarly, don't scour your face with harsh scrubbing. Gently exfoliate with a cleanser like this one raved about by thousands of women on our Facebook page. Don't let makeup buildup overnight to cause pore blockages and in turn, breakouts. Even when you're tired, cleanse that face girl! 2. Brush Your FaceFacial brushes are a fairly new phenomenon and one might wonder, is it really necessary to brush my face? Well, you brush your hair to make it shiny and vibrant, right? Same goes for your face, if done right. Dry facial brushing detoxifies your skin of built-up toxins and exfoliates dead skin cells that create blockages. So how do you do it? First snag a facial brush with good reviews. This one is a top rated one, but if you're on a tighter budget, lots of people love THIS ONE. After you've washed your face, dry off any excess water and begin brushing under the chin and move upward. Use gentle, upward motions until you get to the forehead. Go ahead and give your neck a little love too. Finish with your favorite moisturizer. 3. The Miracle Mask Everyone Swears byWhen I heard my besties raving about this miracle clay, I'll admit, it piqued my interest. If you've never heard of bentonite clay, it is actually ash made from volcanos here in the United States. Naturalists claim it has amazing healing powers, especially with acne-laden skin. You can buy it in powder form and make your own natural facial mask, or you can buy this one that has incredible reviews (over 12,000!). This clay mask also has fantastic reviews. Men and women who've struggled with acne their whole lives swear by this Indian Healing Clay. You can't help the hormones traversing your body but you don't have to settle for adult acne. Try these three strategies and see if they make a difference. It's always worth a conversation with your doctor or dermatologist as well. And we're dying to know what works for you…feel free to comment below! Photo credit: Savannah Poulsen Looking for more beauty hacks to try? Check out these fun ideas you can do at home today: Coconut Oil for Hair Moisture Treatment: Hair Health and Growth The Busy Gal's 6 Quick Tricks to Better Skin The post 3 Ways To Tackle Adult Acne for Good appeared first on How Does She. There's nothing more magical then twinkling Christmas lights and this marks the fourth year of sharing my glowing Christmas lights night tour that positively sparkles. Cozy up by my roaring fire and enter this magical winter wonderland. Don't miss the end of this post where I link to 20 other bloggers who are sharing their […] The post Glowing Christmas Lights Night Tour appeared first on Kelly Elko. When planning a bathroom renovation, you need to choose a design option that meets your existing and future needs. This may be a simple renovation to replace fixtures or a complex project to change the layout and enlarge the bathroom. Our guide to planning a bathroom renovation will give you plenty of food for thought so you can decide how to proceed. 1. Bathroom layoutThink about your current bathroom layout. Is it flexible enough to meet your existing or future needs for space and storage? Is there anything about the layout that bothers you, e.g. perhaps it's noticeably cold or drafty while taking a bath or feels cramped and poky? Get a bathroom designer in to assess the structure carefully so you know the limits of your bathroom. The proposed renovation must either fit the existing structure or the required structural changes must be possible. They can also draw you up a basic draft of the best layout for the space. 2. FixturesWhen it comes to fixtures, it's a good idea to create a wish list of everything you want in your bathroom reno. After all, modern bathrooms are all about pampering, as well as functionality. Even if you have to cut your list back at a later date due to budget or size constraints, at least it'll be a conscious decision, and not because you didn't realise you could have it. Fixtures you might want to consider for a new layout include: His & hers sinks 3. Lighting
Think about the existing lighting. Is it visually pleasing or is it outdated? Does it use energy efficiently? Does it give out adequate light or do you need more overall light or task lighting? Ideally, a bathroom should have a few layers of lighting including:
In a bathroom reno, a lighting update may be as simple as replacing the existing fixtures with new ones or as complex as a complete redesign. If you're adding a lot of new features, then you may need new wiring and outlets for increased loads (e.g. whirlpool tubs or underfloor heating). 4. Colour ideasChoosing a colour scheme is one of the most important factors of a bathroom reno. The right colours will make you want to spend time in your new bathroom, not avoid it. You may have set ideas on the colours you want to use, or you may need more time to research ideas on interior decorating sites. If you're not sure where to start or don't want to get it wrong, here are some ideas to help you out:
5. Storage requirementsNot enough bathroom storage is a common complaint for many homeowners. So make sure your new bathroom takes care of all your storage needs. Think about how many people will use the bathroom on a regular basis. If it's an ensuite for a master bedroom, for example, then you won't need as much storage as a family bathroom does. What items do you want to store in the bathroom for ease of access: towels, toilet paper, extra shampoo, toothpaste? What kind of storage do you want, inbuilt or freestanding? Even if you have a small bathroom you can get creative by adding inset shelving to a wall, a corner or above the doorway. 6. Tiling heightChoosing the right tiling height is important when renovating because it will affect the overall look and feel of the bathroom. As well as the cost. You can tile to a certain level, for example, to the top of the window or door architrave. You can also have different tiling levels in the one bathroom or you can tile to the ceiling. All will have a different effect on how the bathroom will look. Speak to a bathroom designer about tiling to get professional advice on what will work in your space. 7. What to budget?A complete bathroom renovation, in general, cost you between $20,000 and $30,000, a luxury bathroom renovation over $50,000. At the end of the day, the overall cost estimate of the bathroom renovation will be affected by how labour intensive it is, (e.g. tilers, plumbers, builders) and the how many luxury features you add. To keep within your budget, prioritise your wishlist and avoid a bathroom renovation blowout by:
If you'd like to find out what's possible in terms of a bathroom renovation in your space, get in touch with the team at Bubbles Bathrooms today – we look forward to hearing from you! The post 7 tips to planning a bathroom renovation appeared first on Bubbles Bathrooms. |